
Last Updates: 8/21/2024
Warning: If you are looking at a post and the date still reads 2021 or so please be careful with it. This is an actively developed product and the “way” you achieve things moves a little over time.
Before we begin. Let’s start from the beginning and talk about what vault does and the theory of operation. Understanding the theory is handy for when things go south. You should always know where all the important pieces are stored as well as how things should look when things are well.
There are number of ways to install vault.
1) compile it using go from the source repository
2) install using the deb file. (this post)
3) using docker
Purpose:
The purpose of vault is the equivalent of AWS secrets or Microsoft Vault. it is a way to store items so that the secrets can be dynamic and not configured directly into the code or learned from some kind of environmental file. There is nothing worse than finding a file named password.txt on someone’s system.
Theory of Operation:
I am just going to spit out a few directories at first that you should know exist.
/etc/vault.d/ Which by default will contain two files.
root@nodex:/etc/vault.d# ls -al
total 12
drwxr-xr-x   2 vault vault 4096 Aug 21 20:38 .
drwxr-xr-x 115 root  root  4096 Aug 16 06:31 ..
-rw-r--r--   1 vault vault    0 Oct 10  2022 vault.env
-rw-r--r--   1 vault vault 1054 Aug  6 21:30 vault.hcl
You will note that the vault.env file is of length 0.
You can achieve the same thing if you enter
root@vault:/etc/vault.d# touch vault.env
root@vault:/etc/vault.d# ls -la
total 8
drwxr-xr-x   2 vault vault 4096 Aug 21 20:52 .
drwxr-xr-x 111 root  root  4096 Aug 21 18:58 ..
-rw-r--r--   1 root  root     0 Aug 21 20:52 vault.env
The vault.hcl file looks like:
If I took the time to record this…. you got to figure at some point it was to get back to at least where I started. <shrug> Yup life is like that. You might want to take this file and just make a backup of it before going to far. Another way of handling encryption security would be to comment back in the HTTP function and then use NGINX.
# Copyright (c) HashiCorp, Inc.
# SPDX-License-Identifier: BUSL-1.1

# Full configuration options can be found at https://developer.hashicorp.com/vault/docs/configuration

ui = true

#mlock = true
#disable_mlock = true

storage "file" {
  path = "/opt/vault/data"
}

#storage "consul" {
#  address = "127.0.0.1:8500"
#  path    = "vault"
#}

# HTTP listener
#listener "tcp" {
#  address = "127.0.0.1:8200"
#  tls_disable = 1
#}

# HTTPS listener
listener "tcp" {
  address       = "0.0.0.0:8200"
  tls_cert_file = "/opt/vault/tls/tls.crt"
  tls_key_file  = "/opt/vault/tls/tls.key"
}

# Enterprise license_path
# This will be required for enterprise as of v1.8
#license_path = "/etc/vault.d/vault.hclic"

# Example AWS KMS auto unseal
#seal "awskms" {
#  region = "us-east-1"
#  kms_key_id = "REPLACE-ME"
#}

# Example HSM auto unseal
#seal "pkcs11" {
#  lib            = "/usr/vault/lib/libCryptoki2_64.so"
#  slot           = "0"
#  pin            = "AAAA-BBBB-CCCC-DDDD"
#  key_label      = "vault-hsm-key"
#  hmac_key_label = "vault-hsm-hmac-key"
#}
Installation:
The first thing we need to do is to alter the apt list in order to inherit hashicorps repository.
wget -O- https://apt.releases.hashicorp.com/gpg | sudo gpg --dearmor -o /usr/share/keyrings/hashicorp-archive-keyring.gpg
echo "deb [signed-by=/usr/share/keyrings/hashicorp-archive-keyring.gpg] https://apt.releases.hashicorp.com $(lsb_release -cs) main" | sudo tee /etc/apt/sources.list.d/hashicorp.list
sudo apt update && sudo apt install vault
Now update your repository indexes.
apt updateUsing apt/aptitude to install vault from the repository.
apt install vaultIn this post we are going to talk about installing use the deb file. Please note that this site contains a few references to vault. So please remember to look around. The post should also exist for creating and using a easy-rsa CA signed cert. There exists a post for installing easy-rsa and guides for using OpenSSL to create configuration request files to automate and verify a consistent certificate request.
The default load:
In my case I named the machine vault.sparelab.net. There should be a separate post found here for creating a sperate SSL certificate for this. A certificate that is NOT the default self signed cert generated at install time.
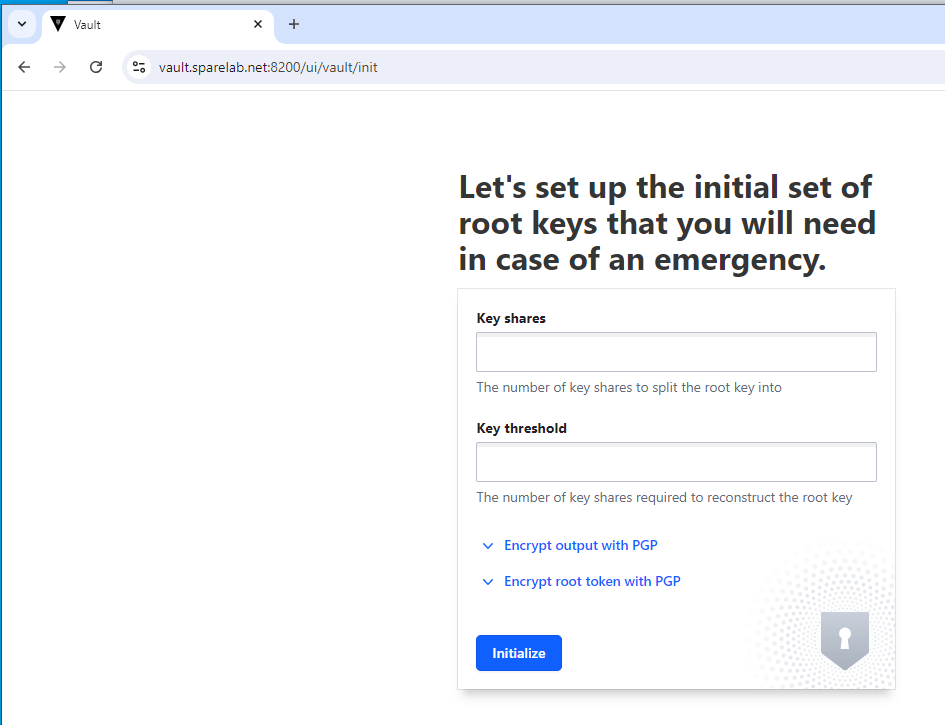
If you see the following Image: It’s because you have plowed through. if you install vault and use the CLI you can avoid this. Or at least it can be an alternative. What it is asking you here for is a number of keys that should be generated and how many keys need to be presented in order “unseal” the vault.
Random Suggestion (having no base practical merit – use at your own risk, etc.)
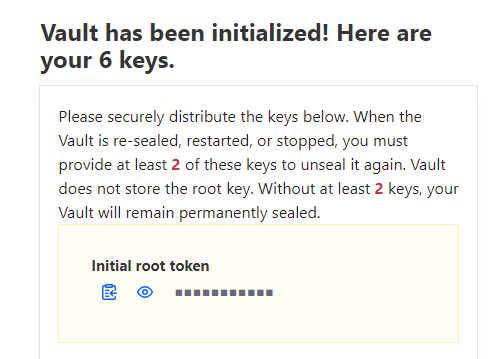
6 and 2 might are offered as numbers. It should allow you to save the resulting token and keys. Please do. As they are only generated at this time and you are going to need them in the future. 🙂
please note the initial root token is also given here. You are going to want to save this.
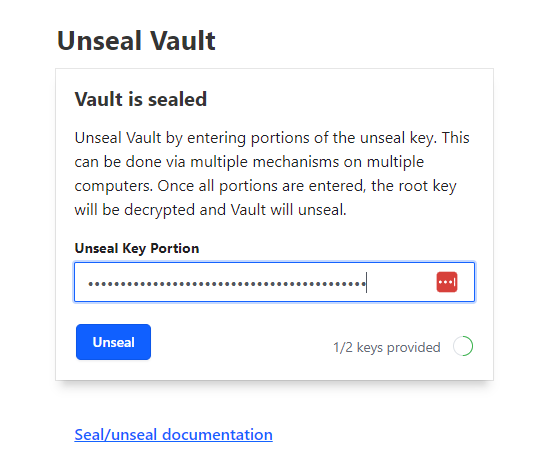
Initially the vault is sealed. In order to continue, the vault needs to be unsealed. Again we plowed forward and are doing this using the GUI. There is a way to patiently work through the initial unsealing via the CLI as well (not discussed here).
In our case we mentioned that we wanted 6 random keys; any 2 of which can be used to offer proof of identity and can be used to unseal the vault – effectively bringing it into production. You would just enter 2 keys; and then hit the unseal button.
Some Command line Information:
In order to check your vault version
root@vault:/etc/vault.d# vault --version
Vault v1.17.3 (c91c85442144e1228c02123fc4b19337f7d52700), built 2024-08-06T14:28:45Z
In order to assist the CLI we should set the VAULT_ADDR variable so that it may be referenced.
root@vault export VAULT_ADDR=https://vault.sparelab.net:8200Simply checking the export of the VAULT_ADDR variable.
root@vault set | grep VAULT_ADDR
VAULT_ADDR=https://vault.sparelab.net:8200
Assuming everything is hunky-dorey you can check on the status of the vault.
root@vault:/usr/local/share/ca-certificates# vault status
Key             Value
---             -----
Seal Type       shamir
Initialized     true
Sealed          false
Total Shares    6
Threshold       2
Version         1.17.3
Build Date      2024-08-06T14:28:45Z
Storage Type    file
Cluster Name    vault-cluster-b92e1539
Cluster ID      8cb30b5b-ec9b-1752-aecc-1f67dc990f40
HA Enabled      false
Using the CLI and presenting your token to login.
root@vault:/usr/local/share/ca-certificates# vault login
Token (will be hidden):
Success! You are now authenticated. The token information displayed below
is already stored in the token helper. You do NOT need to run "vault login"
again. Future Vault requests will automatically use this token.

Key                  Value
---                  -----
token                hvs.NMAG[obsufuscated]
token_accessor       Wfzfn9bRzqJn7abDopwHAi2y
token_duration       ∞
token_renewable      false
token_policies       ["root"]
identity_policies    []
policies             ["root"]
For the next two examples to work, they depend on a a keyvault named “secret” to exist. I can’t put into or read from a “keyvault” that doesn’t exist. So please note that the next exampled created a kevault (kv) named (having -path=secret) secret.
vault secrets enable -path=secret kvNow that it exists we can store a secret in the vault.
root@vault:~# vault kv put secret/password value=test
Success! Data written to: secret/password
Retrieving a secret from the vault with the cli..
root@vault:~# vault kv get secret/password
==== Data ====
Key      Value
---      -----
value    test
If there is a question, you can simply list the available vaults.
root@vault:~# vault secrets list
Path          Type         Accessor              Description
----          ----         --------              -----------
cubbyhole/    cubbyhole    cubbyhole_9dcabbb6    per-token private secret storage
identity/     identity     identity_f17a5fc3     identity store
kv/           kv           kv_30ee9847           n/a
secret/       kv           kv_c69732b7           n/a
sys/          system       system_1f80b475       system endpoints used for control, policy and debugging
root@vault:~#
I am not going to list everything in there labeled this.
root@vault:~# vault secrets list -detailed
How do I delete a vault? you disable it. Let’s say you create one by accident, named “kv”. Then the following would get rid of it.
vault secrets disable kv/
References:
https://phoenixnap.com/kb/how-to-install-vault-ubuntu
https://medium.com/@achatterjee.82/how-to-install-hashicorp-vault-on-ubuntu-a28740a7e88b
